


Transforming A "Goodwill" Sideboard From Unattractive To Unforgettable: Part Two!
- Lori Siegel

- Feb 1
- 1 min read

In the first part of this blog, I described how I found a rather "dated" console at Goodwill for only $5. Despite the red velvet and ornate door design, I was confident I could modify it to look like units I have seen in Pottery Barn and Ballard Design catalogs. Plus, if it did not work, it was just a $5 investment.


We left off in the first blog removing the ornate panels and red velvet, giving it a good clean and then applying a primer coat.


For this post, the first task was for my husband to measure and cut panels to fit the doors. I then glued them in place and let them dry overnight.


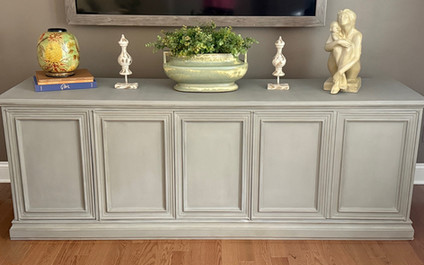
The following day we cut some additional molding to finish off the center panels. I attached them using wood glue and filled any spaces with caulk. After everything dried, I applied Annie Sloan French Linen Chalk Paint with my new spray gun. The next day I added clear and dark wax for depth.

This is the completed piece. Once we placed it in the family room under the television, I did a happy dance. It actually looked like the pieces in the Pottery Barn and Ballard Designs catalogs. I couldn't have been more delighted!


Just a reminder of what it looked like before and what it looks like now. I would love to hear from you about hardware for the piece. Should we leave it without hardware using a push/spring closures or add knobs or handles? What do you think?
If you enjoyed this post, please give it a like (the heart below). I would appreciate it!

I love it without hardware. It gives it a clean finished look. I think if you do get hardware it should be something simple